Saturday, June 25, 2011

A bit of Boston Culture

While visiting the artisan asylum I had the privilege of riding a tall bike ... but at the I didn't know it because I was told that "this type of ship is called a harve" or H.A.R.V which stands for High Altitude Reconnaissance Vehicle.
"Ship?" I asked ... "yes they are called ships, this one's name is Skylab."
A little research shows that I was speaking to a member of SCUL, an awesome "bicycle nerd gang [1]" which roams around Boston on "missions" collecting high fives from bystanders.
Don't believe that this crazy bike is really called a High Altitude Reconnaissance Vehicle, check out the helpful glossary they have on their website ... this website has a wax seal at the bottom - pretty classy.

Thursday, June 23, 2011

Thanks, The Masmid

My brother's friend, who, coincidentally, is my friend's brother, alerted me to the fact that this year's YU Masmid yearbook has granted me a doctorate:
While I appreciate the thought, I'm not about to add it to my CV.

Tuesday, June 21, 2011

Aryeh Cooks: Summer 2011 Part 1

The purpose of this post is to leave you salivating.  I am not going to give instructions on how to make any of these things here.  However, if there is something that you all want to know how to make I may do a regular Aryeh Cooks post for it.

I am on summer break and as a result I now have time to cook and bake.  Needless to say I have been doing so.  My parents get to enjoy what I make and the rest of my immediate family gets to drool when I send them pictures.  Now it is your turn to drool.  These are what I have made so far (baguettes excluded, because you already know about those).

Foccacia a pizza like thick bread.
 Ciabatta an Italian white bread.
 Tortellini a small Italian stuffed pasta (vidalia onion, ricotta and spinach) .
 
 Sesame seed crusted, soy sauce based marinated salmon with a rissoto like treatment of brown rice and Israeli couscous, all topped with a sauce based on the marinade.
 Blintz, stuffed with a potato, onion filling and also with the same vidalia, ricotta and spinach filling I used for the tortellini (I made these for Shavuot).  And of course I did make my own crêpes.
 Palak Paneer with onion and cumin seed naan.  I also made the paneer for the dish.
 Dessert.  Lets start with the Cinnamon Buns.
 Chocolate Cinnamon Babka, with a streusel topping.
Finishing up with the biggest chocolate layer cake I have ever made, six layers of cake and six layers of pastry cream (so 12 layers).

If you are drooling all over your keyboard then my job here is done.

Thursday, June 16, 2011

Marketing 102

Last week's Teaneck Suburbanite had an "Adopt a pet" ad, starring this friendly, entirely sane, well tempered, photogenic, and definitely not possessed doggy:
You tell me, does this profile match this face:
There are absolutely no negative words to describe this precious young lady ... Not only is her personality irresistible, but ... who can resist that face?
Believe it or not, she's still up for adoption. I wonder what happened to demon cat...

Tuesday, June 14, 2011

The Making Of a Photo

Well time to take a trip back to California.  During the trip I kept wanting to get a good picture to replace my old Facebook photo.  So on a number of occasions I did something silly in front of something incredible.  Here is the string of photos from which I chose my new photo from.


Sunday, June 12, 2011

Egg Geology

Many of us have seen old lava flows and volcanoes - but did you know that you can make a yolk volcano? I didn't until I discovered it by accident (... and despite my best efforts I have not been able to replicate it).

How to find it
You will know one of your hard boiled eggs harbors a yolk volcano if you find the following yolk strings in the water:


The source of the flow
Follow the strings until you find the source, you guessed it, a hole in the side of the egg where the shell broke and the yolk slowly oozed out, boiling along the way.

Peeling away the outer layers shows the structure of the volcano where the yolk (magma) broke to the surface of the white (crust).

Splitting open the yolk you can see the stress fractures in the direction of maximal ooz.


But what pushed it out?
The little air pocket in the egg expanded as the water boiled leaving a nice airy room (which filled with water once the egg cooled.

Sunday, June 05, 2011

Turks Head from a Plane

It is always nice when you recognize places you have been from a plane. On the way back from California I took this picture of Turks Head in Canyonlands Utah.
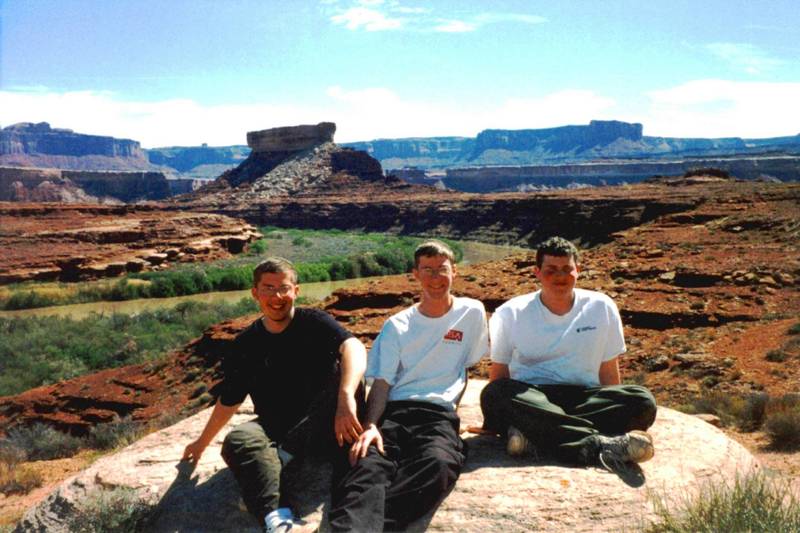
Below is a picture of my brothers and I inside that canyon in front of Turks Head (we conoed down that river).

Here is the zoomed out version of the airplane photo.

I've tried to recreate the scene with google earth here

But in case you don't have that plugin then you can see a poor-man's version of the view from bing maps here.


Thursday, June 02, 2011

The Flag

I decided to participate in Playing with Mathematica's "make a US flag using Mathematica" contest. Making the stripes and blue section is fairly trivial to do in Mathematica, so I won't go into that. But, I like my method for making the stars. There's a little bit of math here, so feel free to skip down to the pictures at the bottom.

First, note that a five-sided star, like that on the US flag, can be constructed as follows:

If you take a regular pentagon (thick black lines) and connect all the vertices (numbered blue dots), you sketch a star. Alternatively, if you start with one vertex, and, traveling in a counter-clockwise direction, skip a vertex and connect the two, and repeat you get the same thing (i.e. line from 1 to 3, then 3 to 5, then 5 to 2, then 2 to 4, then 4 to 1).

However, to sketch the perimeter of the star, you also need to include the lettered vertices of the smaller, red, pentagon which is formed by the inscribed star. To get the resulting star shape, you need to connect the vertices in order:

The way I did this in Mathematica was using complex notation. The corners of the pentagons in the Complex Plane are given by
where n is an integer from 0 to 4 and A is the length from the origin to a corner (I rotated them by pi/10 to straighten the thing out). If A for the outer pentagon is 1, then the inner one is
.
Then, to get the vertices in order, you just need to sort them in order of Argument. All this is pretty easy to do in Mathematica:
starVert = (#1[[Ordering[Arg[#1]]]] & )[Join[E^(I*(Pi/10))*Exp[2*2*Range[6]*Pi*(I/5)], (1/2)*(3 - Sqrt[5])*E^(I*(Pi + Pi/10))*Exp[2*Range[6]*Pi*(I/5)]]]

Then I just mapped Re[coords] to x and Im[coords] to y, tiled the stars on the flag, and:

But, I wanted to make the flag wave. To do that, I summed 7 time-dependent sin curves in 2D with (bounded) random wavevector and frequencies. A resulting surface looks like this, for example:
Then, I used Mathematica's Texture functionality to use the flag Graphics I created on the surface:
And then, I animated it (click through for the subtle effect):

This was the one I submitted for the contest. Since then, I've seen Eric Brodeur's amazing Mathematica flag:
which is far better than the one I submitted. I'm not sure why I decided to do a top-down view, rather than the side view (also, I'm not sure how he got rid of framing boxes around the surface). Anyway, it's been fun.

Tuesday, May 31, 2011

Aryeh Cooks: Baguettes

Baguettes are the classic French bread.  There seems to be a trend here, where I keep saying things are easy, but it is the truth.  For many foods all you need is a good recipe, good instructions, and good technique.  The recipe I use is very simple.

5 and 1/3 cups of bread flour (unbleached is better but not necessary)
2 teaspoons of salt
2 and 1/4 teaspoons of yeast
2 cups of warm water (about body temp)

First mix all the dry ingredients together in a bowl.


Then add the water and mix.  You can use a stand mixer, a spoon or your hands.  Work it until it form a rough shaggy ball.  Then let it sit for about 5 minutes.  This rest allows the flour to fully hydrate and any gluten that has been produced to relax.

Warning: This paragraph contains science!!!  Gluten is a protein composite found in wheat flour.  Gluten is comprised of Glutenin and Gliadin.  The Glutenin looks like a long spring.  When the dough gets hydrated and worked the Glutenin springs get stretched out and worked into each other, exactly like a whole bunch of springs loose in a box.  This network of interlocked "springs" give bread dough its elasticity and allow for the bread to rise when carbon dioxide is released from yeast.  The important thing to know about yeast is that it does not generate bubbles in the dough.  Rather, it releases carbon dioxide into the water in the dough which is then released into existing air pockets in the dough.  So the more you work air into the dough when kneading it the better.

Now knead the dough for a couple of minutes, either by hand or with the dough hook on your stand mixer.  This works to integrate air bubbles into the dough and to build up gluten chains (interlinking of individual Glutenin strands togther).

Roll the dough into a rough ball and place the seam side down into a lightly oiled bowl.  Cover the bowl with plastic wrap and place in the fridge.  This probably seems strange to a lot of people who make bread, because yeast does not work well in fridges as it go mostly dormant at about 45 degrees Fahrenheit.  Well recently I tried an extended fermentation, and I must say I love the results.  For convenience you don't need to dedicate a large extended period of time to bake bread.  Instead, you can break up each part of the process as it is convenience for you.  However, the big reason is flavor, overnight fermentation reduces the bitter yeast flavors and results in a much more complex flavor profile.  Additionally, letting it sit results in even more gluten development and therefor reduces the required amount of kneading when making the dough.  I recommend it for all bread doughs, and it will be featured in every Aryeh Cooks where I make a bread of some kind.

Leave the dough in the fridge overnight or for up to four days.  Take the dough out of the fridge about one to two hours before baking.  Split the dough into the number of baguettes you intend to bake (I make three).  It is important to try and degas the dough as little as possible.  Shape each piece into a Bâtard (a rectangular piece of dough about 6-8 inches long).


Then roll them out to the desired length, tapering the ends to get the classic baguette shape.  I have a special pan for baking baguettes but it is not necessary.  Just put the loafs on a clean piece of fabric or dishcloth with the seam down and with the fabric bunched up as show with the Bâtards above.  This ensures that they rise up and not out.


Brush the top of the baguettes with vegetable oil (I would recommend against using olive oil as it will give the bread a much darker almost burnt color when baked due to its lower smoke point) and cover loosely with plastic wrap.  I use a clean garbage bag and put the pan into it.  If you put the cloth and baguettes on a sheet pan you can do the same.

Let the dough proof for about an hour or until it increases by about one and a half times (this may take as long as an hour and a half).  About a half hour before baking preheat the oven to 550 degrees Fahrenheit and put an older sheet pan on the bottom rack.

Remove the plastic about 15 minutes before baking.  Right before the baking comes the scoring.  I would recommend transferring the loafs from the cloth to a sheet pan before you score them.  This is the hardest part and after baking about 20 baguettes I am still not very good at it, so don't stress about it, practice makes perfect.  The trick is to use a razor blade or serrated knife.  I get about four scores on a 18 inch baguette.  You want all the cuts to be on a diagonal in about the center inch of the loaf.  Additionally, you want the blade angled to the side (so not perpendicular to the table, rather at about a 45 degree angle).  You want the scoring to be about a half inch deep.  However, it is more important that you don't crush the loaf, so be gentle.


These are from my first attempts, and not very good (you will notice that each loaf has a different number of scores on it).  However, you should get the idea.

Now comes the trick to baking this kind of bread in your home oven.  The trick is steam.  It is important that in the first stages of baking steam is present.  The moisture keeps the top of the dough moist and allows it to have an excellent oven spring (large expansion of the loaf in the oven).  Additionally, it helps get a nice crisp crust.  The way you do this is to take one cup of hot water and pour it into the baking sheet at the bottom of the oven when you put the loafs onto the second to top shelf.

This is a bit of a juggling act.  Keep the hot water right next to the oven and as soon as you put the loafs in pour the water into the pan.  Be very careful here as boiling water will splash everywhere.  Additionally, make sure that the glass front of the oven is covered with a dishcloth as the initial spurt of boiling water spray could potentially cause it to crack.

As soon as the loafs are in and the water has been put in the steam pan, shut the oven and reduce the temperature to 450 degrees.  Bake for 12 minutes.  Then remove the steam pan being careful of any water still in it.  Then rotate the pan and bake for another 10-25 minutes (this all depends on your particular oven).  When the loaf is a nice dark golden brown and sounds hollow when knocked on it is done.  Transfer to a wire cooling rack for 45 minutes before cutting.


The important thing is to have fun and enjoy the nice crispy crust and soft insides of the baguette.  It stays good for a couple of days and an airline flight to California (I took three with me when I was joining my family on vacation), just store it in a paper bag.  When you want to eat it just heat your oven to 450 degrees and put the bread in for 2-3 minutes and the crust should crisp up again.